Helpdesk
Interakt’s Helpdesk App was designed to gather suggestions, ideas, support queries & issues. Analyze all this in one place to improve.
Contents
- What is a Ticket?
- Ticket Types
- Inbox and Statuses
- Setting up Helpdesk & Feedback widget
- Dealing with Tickets
- How do people submit Tickets?
- Creating Tickets Manually
- How do I access Support Tickets?
- Replying to a Ticket
- How do I insert a Canned Response into a ticket?
- How do I insert answers from Interakt FAQ?
- How do I enable Self Help?
- How do I add Notes to Tickets?
- Assigning a Ticket
- Ticket Labels
- Adding Custom Fields
- Customer Satisfaction Survey
- Email Routing
- Helpdesk Tools/Actions
- Enable / Disable Helpdesk & Feedback Widget
- Helpdesk Reports
- Third Party Integrations
Since every support request is logged into Interakt and mapped with User Profiles it is easy to review the complete history, previous conversations and see who else from your team has been working on a particular issue, and what they said.
"Helpdesk & Feedback widget" allows visitors and customers to contact right through your home page using a simple form that appears in the lower right corner. Every message submitted can be tracked via Interakt Helpdesk.
What is a Ticket?
A Ticket is a request or query submitted by Users. Requests submitted via Email or Helpdesk widget will automatically be converted into Tickets.
Ticket Types
Interakt classifies Tickets in four types and Users or Visitors can choose a category while submitting them. Agents may reorganize Tickets under suitable categories if they wish.
- Like
- Question
- Suggestion
- Issue
Inbox and Statuses
Support Tickets passes through different levels once they are submitted and they can be accessed under Inbox.
- New : All the newly opened Tickets appear are shown with this status. New tickets are the open requests/queries which needs to be answered.
- Assigned to Me: An Agent sees all the Tickets assigned to them here.
- Opened: Opened status signifies that the tickets are awaiting an agent's reply. These tickets are chosen to be opened when something has to be done on agent’s end.
- Pending: Pending Tickets are the queries which are not resolved and awaiting a response from "Agents" or "Customers".
- Closed: Closed Tickets are the requests which are answered and closed.
- Spam: Agents choose this if a ticket seems like a spam or an advertisement that is unrelated to a product or a service which the helpdesk is meant for.
Setting up Helpdesk & Feedback widget
Helpdesk & Feedback widget will show up on your homepage as soon as you integrate Interakt and you are free to customize the Feedback form to suit your needs. Let us see how we do that.
Widget Settings:
Login to your Interakt account, navigate to Helpdesk and click on Helpdesk Settings under Settings to start configuring Helpdesk.
- Widget Options: Enable your Helpdesk & Feedback widget and specify on which device you want to show. By default, it can be accessed on both Web & Mobile browsers.
- Messages & Features: Give it a title and enter a message to show after ticket submission. Check "Simple Captcha" for spam protection. You can uncheck "Attach a File" if you don't want users/visitors to attach files. Enable "Screen Capture" to let visitors/users to grab their screens while submitting the form.
- Button Settings: Specify a color and set a position for your Widget button as per your website theme. Also, button title can be edited.
- Form Field Labels Interakt Helpdesk lets you edit field labels and add custom fields to the feedback form. Feel free to use your own language if you wish.
It is your choice to decide whom you want to allow for ticket submission under Target Audience. Access to Helpdesk & Feedback widget can be restricted to Visitors, Users or allow both Users and Visitors. You are free to opt for user segments.
Email Forwarding & Notifications:
Forward Emails: Your email server can be configured to forward emails to Interakt where they will be converted into tickets. See Email Routing
- Copy Interakt email address and configure as "forward to" email address on your email server
- Enter the support address from which you are forwarding emails, e.g., support@example.com
Helpdesk Notification Settings: You can enable or disable email notifications
- Email Alerts to Team Members: Interakt alerts team members when there is a new ticket or a reply from customers. You can turn off notifications just by unchecking the checkbox.
- Send Automated Ticket Replies: Interakt sends an acknowledgement email to customers when a new ticket, offline chat or feedback is submitted. Uncheck the box to disable and check to re-enable notifications.
Canned Responses:
Canned Responses are prewritten answers that enables you to quickly reply to common requests. Using canned responses is a great way to answer customers more efficiently. Also, that helps to keep the tone and language consistent between agents across all customer interactions.
Adding a Canned Response
Canned Responses are created and managed under Helpdesk settings. To create a Canned Message:
- Click + New Response on the top right
- Give it a name
- Enter the message that you want to insert into tickets
- Click Save to publish
Editing a Canned Response
Canned Responses can easily be edited at any time just by clicking on "Edit".
To edit,
- Find the canned message that you want and click on Edit
- Update the message (or title) and click "Save"
Deleting a Canned Response
To delete a canned response:
- Select one or more canned response that you want to delete
- Look for the "Delete" button on the top right and click it. You will be asked to confirm the action as messages once deleted cannot be rolled back.
Auto Responder
You can set up auto email content that goes out to the users when a ticket is submitted, offline chat or feedback. For that,
- Navigate to Settings → Apps → Auto Responder
- Add or update the email content and click Save.
Dealing with Tickets:
Customers will submit their support requests in three different ways.
- Feedback Form: Requests submitted through Helpdesk & Feedback form are converted into tickets.
- Support Email: Any email sent to support address will automatically be converted into a ticket. See Email Routing.
- Manual: Agents may also add tickets manually by logging into Interakt account and these are labeled as “Manual”.
How do people submit Tickets?
Visitors/Users may submit Support Tickets anytime by email or using the Helpdesk / Feedback Form and you can track them around the clock. The system alerts you the moment you have new messages like the old AOL mail in a modern way so that you reply in a timely bound manner.
Customer requests via Helpdesk / Feedback Form
- Users will see a
 Feedback button on your website as per the target page settings.
 - They will click the button and the form will appear on their side, they fill and submit details.
See the Pen Interakt Sticky Helpdesk Widget by Ashok (@asshu) on CodePen.
Is there a way I can make my Interakt Helpdesk / Feedback widget pop up when visitors click on a custom link or a button on my website?
Yes, you need to call the popup using this hook - interaktfb();
Please note that this feature is still in beta.
Creating Tickets on behalf of customers(manually)
Agents can create tickets on behalf of customers. For that,
- Open the customer's profile on whose behalf you wish to submit a ticket.
- Hover over the button + New on the top bar and click on Ticket from the dropdown menu.
Fill up ticket details and assign it to concerned agents.
- Name: Enter the customer’s name for whom you are creating the ticket.
- Email: Provide the customer’s email address and he will be notified once it is created(if you choose to notify).
- Assigned To: Select an agent to whom you want to assign the ticket.
- Category: Specify a category for this new ticket.
- Message: Explain the issue in detailed.
- Notify Lead/ User: Check this option if you want the Customer/Lead be notified(by email) once the ticket is added.
You can do the same for Leads by navigating to Lead Profiles.
How do I access Support Tickets?
Tickets & offline chat messages are collected through Helpdesk App. To access the tickets, login to your Interakt account and click on Helpdesk from the side nav.
You see your Inbox with different Ticket statuses on the left. Click on New to check the newly submitted Tickets.
- You can switch from one visitor/user’s message to another that appears on the left.
- User queries are categorized based on the type they choose. You can browse through other categories on the left.
- Select the tickets you want to read and decide whether to reply or assign it to your colleague.
- All tickets are neatly arranged and you can open each ticket clicking on the white stripe.
Replying to a Ticket
- Open the ticket you want to access.
- Read the message and enter your answer.
- Hit Reply as Open
- You can attach almost any type of file to ticket responses just by clicking on the attachment icon
- Choosing "Reply as Open" will keep the ticket's status unchanged. You can choose from three statuses while replying.
- You can choose which email addresses (includes additional email addresses added your Interakt account) you want to show as "from" address in email headers
- E-mail addresses of other team members won't be displayed here
You can see the entire interaction history in the ticket section. Ticket responses are threaded and can be viewed under the Helpdesk.
How do I insert a Canned Response into a ticket?
Agents can choose a canned response from the "Replies" dropdown (next to formatting tools on the RTE (Rich-Text Editor) of an open ticket) while replying to tickets. For example, if one of the common questions your customers ask is how to upload a profile picture. Your agents can choose "Profile picture" from the Replies dropdown and insert it.
How do I insert answers from Interakt FAQ?
Agents can insert answers or solutions from Interakt FAQ into ticket responses. To insert,
- Click on "Insert FAQ" within the editor
- Choose a solution that you want to insert
Enabling Self Help
Interakt Self Help makes your job easy by adding searchable FAQs to your widget. Click here for directions on how to enable or disable Self Help.
Assigning a Ticket
Sometimes you may need to assign tickets to another member to deal with. For that:
- Open the particular ticket and click on Not Assigned on the top.
- Specify the staff member from the drop down under "Assign Ticket To" and the system auto saves your choice. No further action is required.
How do I Notes to Tickets?
Interakt allows agents to add Notes to tickets that can be viewed only by Members. This helps agents share information between Members, or simply as a record whilst working on a ticket or dealing with a customer.
A ticket note will be visible on the ticket page along with ticket replies when viewing the corresponding ticket.
To add a note,
- Look for the ticket response form on your ticket page and start typing
- Click "Save Note" on the bottom right to publish.
You can delete Ticket Notes at anytime. For that, you just click "X" on the top right of your ticket notes.
Ticket Labels
Ticket labels indicate certain actions and properties related to tickets. They are:
- <Ticket Assignee>: Agent's name to whom a particular ticket is assigned will be shown on the ticket.
- Responded: You will see this label when a ticket already has a reply
Adding Custom Fields under Widget Settings
Interakt allows you add additional fields to the Helpdesk widget. For that,
- Look for the section Manage Custom Fields In Form under the tab "Form Fields"
- Start adding new fields by clicking on Add Custom Field
- You can choose from three available field types
- Give a name and label to each field
- Click "Save"
Visitors will be able to fill custom fields just like default fields and data entered can be accessed by agents on individual/single ticket pages under "Other Information".
You can delete custom fields just by clicking "X" on the right. Please note that fields once deleted cannot be retrieved.
Customer Satisfaction Survey
Visitors & customers can submit feedback on how satisfied they are with the resolution you provided.
Interakt enables them to send the feedback by adding a rating block to email notifications when you add your response with "Reply as Closed" status.
- Make sure, you add your final response by clicking on "Reply as Closed".
- Agents are not allowed to rate tickets, even if they are the ticket requester.
- Users cannot opt-out of receiving feedback requests.
- Users/visitors receive a feedback request everytime you respond with "Reply as Closed" status.
The survey is designed to maximize the response rate by being quick and simple while also gathering the essential data: good, average or bad rating. Users/visitors can write a review if they wish.
Clicking an "expression" in the email opens a temporary URL to the ticket and prompts the recipient to add a review if they'd like.
You can view the feedback in the ticket conversation page. In this example, the visitor clicked the Great link so the Great button is shaded green to indicate that it is the selected rating. Also, she added feedback.
Email Routing
With Email Routing enabled, you can receive customer requests by email and reply to them via Interakt Helpdesk.
Email requests sent will automatically be converted into Tickets. You can keep an eye on their status and know how well your support staff are dealing with them.
Interakt provides you a unique email address for Helpdesks with each Project. To make things easy, you probably want to set up your support email addresses to forward the emails to this unique email address. The most common way to do this would be set up the Interakt's email id on your email server as a "Forward to" email address.
Once you configure your support address to forward the emails to Interakt, your customers will be able to send in their requests which can be tracked and replied right through your Helpdesk.
This is how the email routing with Helpdesk works:
- When a customer sends an email to your support address, that email gets converted into a ticket and you can keep track of it in your Interakt’s Helpdesk.
- If an agent updates the ticket, a notification email is sent to the customer who originally submitted the support request and he can reply it right through the inbox.
- All the customer replies and agent responses are instantly added to Helpdesk.
- Conversation between customer and agent continues until the issue is resolved or marked as closed.
You can configure your support addresses like - support@example.com to receive customer requests. Emails received at this address become tickets.
Configuring your email account
Support addresses can be configured to forward all the emails to Helpdesk which will be converted into tickets automatically. For that,
- Login to Interakt account, navigate to Settings → Helpdesk Settings
- Copy the auto generated email address.
- Enter the email address from which you want to import emails
- In a new browser window or tab, log in to your Email Account and navigate to your Email settings.
- Look for the option that enables you to forward the emails. In Gmail, Forwarding option can be seen under the tab "Forwarding and POP/IMAP".
- Paste email address in the provided field and save the configuration. Your email service provider may ask you for confirmation.
- voilà! You can start replying the Support Tickets now.
You can provide your users with one or more email addresses for submitting tickets. These are known as support addresses. The Support addresses can be either variation of your support email addresses forwarded to Interakt’s email address. For example,
support@example.com
feedback@example.com
billing@example.com
How do I set up my Gmail account as a Support address?
- Login to Interakt account, navigate to Settings → Helpdesk Settings
- Copy the given email address.
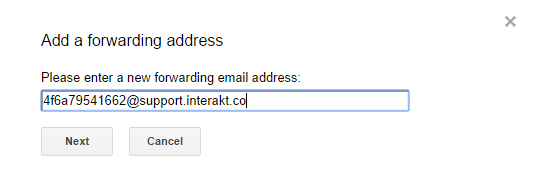
- In a new browser window or tab, log in to your Gmail Account and navigate to your Email settings by clicking on the Settings icon
 .
. - Click the tab Forwarding and POP/IMAP
 .
. - Click the button "Add a forwarding address" and paste the email address in the popup. Click "Next", then hit "Proceed", click "Ok" and save the configuration.
- Gmail sends you a confirmation mail which converts into a Ticket in your Interakt Helpdesk. Go back to your Interakt Helpdesk, look for the email under the status "New" and click the link to confirm.
- voilà! You can start replying the Support Tickets now.
Helpdesk Tools/Actions
There might be times when the ticket is no longer relevant or is relevant, Interakt allows following tools to manage all this.
Change Ticket Status
Ticket status is changed for every action triggered by the system. You can change the status manually from Opened to Pending or Closed.
To change the Status
- You can see the ticket's status on the top of your Ticket page, for example, Open. Click on it.
- Choose from the three different statuses- Open, Pending and Closed under Change Ticket Status. To close a ticket, click on "Closed" and you will be redirected to the Ticket list.
You can see the ticket's last status and who changed it.
Closed Tickets will automatically be opened when there is a reply.
Mark Spam
Not all the tickets are legit. There might be spam emails which were converted into Tickets and you might want to mark them as "Spam".
- To mark a tickat as spam, click the button that shows ticket's status. This opens a drop down - "ticket tools".
- Click "Mark Spam" under Irreversible actions from the dropdown to mark the ticket as spam.
Deleted
Interakt allows you to delete Tickets you don't want to track or keep in your account.
- To delete a ticket, click the button that shows ticket's status. This opens a drop down - "ticket tools".
- Click "Delete Ticket" under Irreversible actions from the dropdown. You can not revert the action once you delete the ticket.
- Hit Ok when the system asks for confirmation.
Enable / Disable Helpdesk & Feedback widget
If you w'd like to enable/disable widget, toggle the slider from the Helpdesk Menu.
Alternatively, you can go to Helpdesk Settings and look for the Widget On/Off button at the top-right. Toggle it to enable/disable.
Helpdesk Reports
Helpdesk Reports provides you an overview of all the important metrics. It also shows you the breakdown of each metric based on various ticket properties like status, category, source and the number of tickets an agent is dealing and their status. You will be able to see how many pending tickets you have this week, where they are coming from and how well your agents are dealing with them.
To access, you just click on the tab Helpdesk Reports in the Helpdesk App.
Activity on Tickets
This summarize how many tickets have you received and overall rating in selected period.
Status of Tickets
Know the rating of all tickets in your helpdesk in particular period. Also, you can learn average response and resolution times.
Category
Get the summary of tickets based on their category
Source
Learn the statistics of tickets you received from different sources
Agents
Keep an eye on how your agents are performing
Third-Party Integrations
Converting Typeform Submissions to Interakt Tickets
Typeform is a cloud-based application that helps you create surveys and other types of forms on any device. You can configure your existing Typeform or create a new one to auto convert form submissions into tickets.
To configure Typeform:
- In a new browser tab, log in to your Typeform Account and navigate to Dashboard.
- In Interakt account, navigate to Helpdesk Settings, look for the support email address and copy to your clipboard.
- Visit the tab or window in which you have opened Typeform Dashboard.
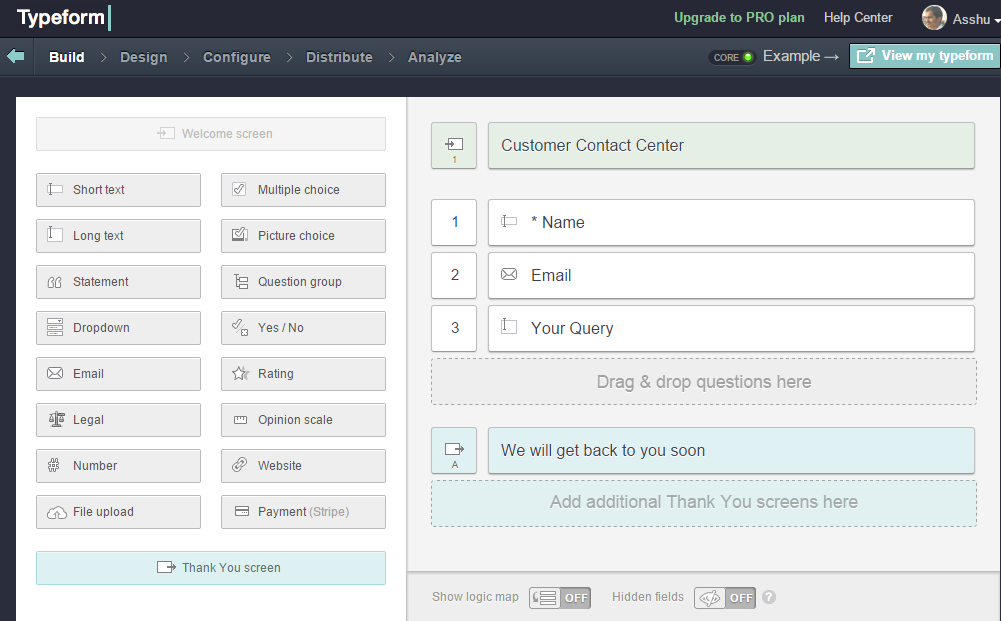
- Open an existing form or create a new form with required data fields. Make sure that it has an email field and a message field which can be used to send data to Interakt.
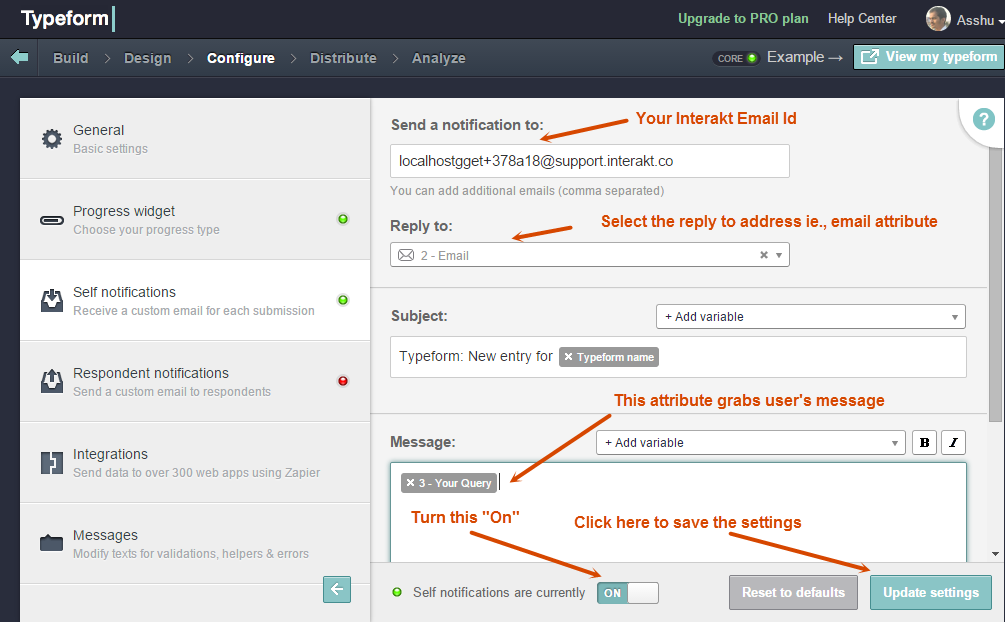
- Open the tab Self notifications under the tab Configure.
- Enter your Interakt email address in the field Send a notification to empty the message box and use the message attribute which you have created earlier.
- Toggle the button Self notifications are currently On/Off to send out notifications.
- Click Update Settings.
Voilà! Start answering customer queries right through Interakt.
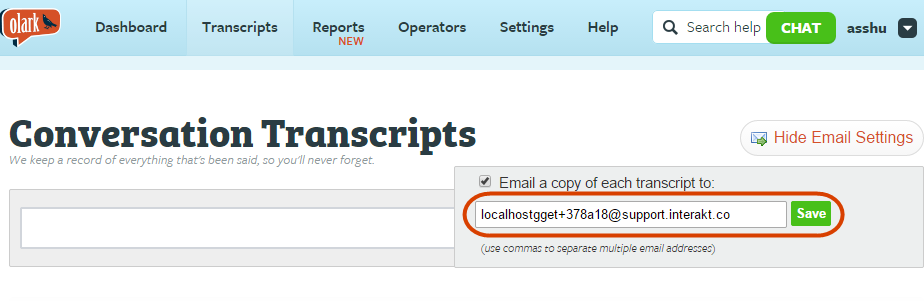
Converting Olark Chat Transcripts to Interakt Tickets
Olark is one of the leading live chat providers. If you use Olark for Live support, you can configure it to forward chat transcripts and offline messages to Interakt. They will automatically be converted into tickets.
To configure Olark:
- In a new browser tab, log in to your Olark Account and navigate to Dashboard.
- In Interakt account, navigate to Helpdesk Settings, look for the support email address and copy to your clipboard.
- Visit the tab or window in which you have opened Olark Dashboard.
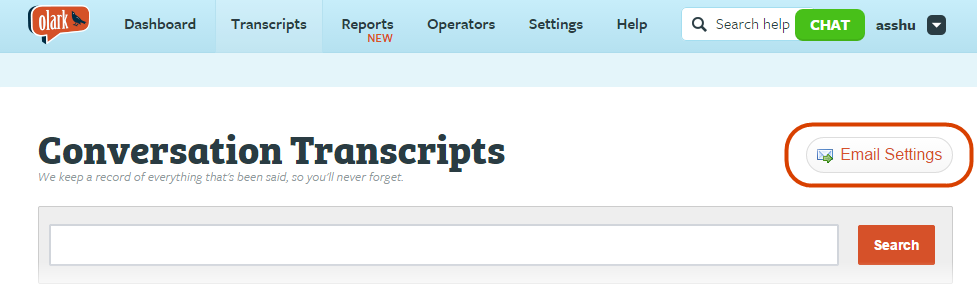
- To convert chat transcripts into tickets, navigate to Transcripts and click on Email Settings.
- Paste the email address you copied from Interakt in the email field and click Save.
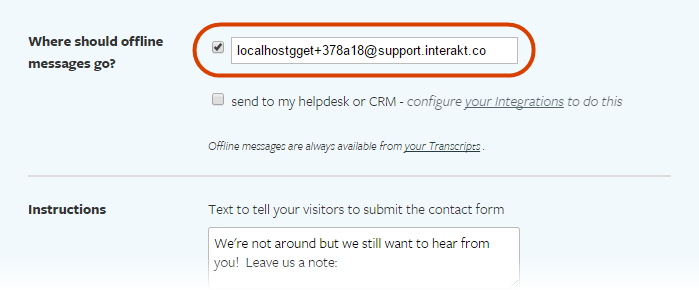
- To convert offline messages into tickets, navigate to Behavior & Text and look for Where should offline messages go?
- Paste the email address you copied from Interakt in the email field and click Save.
- Click Update Settings.
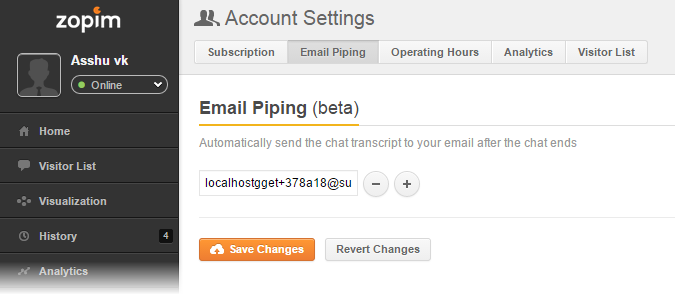
Converting Zopim Chat Transcripts to Interakt Tickets
Zopim lets you monitor and chat with visitors/users surfing your website in real-time. If you use Zopim to offer Live support, you can configure it to forward chat transcripts and offline messages to Interakt. Interakt will automatically convert them into tickets.
To configure Zopim:
- In a new browser tab, log in to your Zopim Account and navigate to Dashboard.
- In Interakt account, navigate to Helpdesk Settings, look for the support email address and copy to your clipboard.
- Visit the tab or window in which you have opened Zopim Dashboard.
- To convert chat transcripts into tickets, navigate to Email Piping.
- Paste the email address you copied from Interakt in the email field and click Save Changes.
Feel free to connect in case of issues at support@interakt.co
⇪ To Contents