Chats
Interakt offers you an advanced Chat App for Live Support where you can answer customer queries in real time.
Contents
- Interakt Chat
- Setting up chat
- Chat Widget
- Chat Targeting
- Offline Mode
- Prechat Form
- Operating Hours
- Chat Triggers
- Automation Scenarios
- Dealing With Chat Conversations
- How do I reply/start a chat?
- How do I enable Self Help?
- How do I insert an answer from FAQ as a chat message
- How do I access Chat History?
- Sending Chat Transcript
- Smart Offline Mode
- Replying to offline messages
- Feature - Reply via Email
- Quick Settings
Interakt’s integrated Chat system allows your clients to approach your agents directly and get a quick solution for their problems. With the live chat option, you can also ping a visitor/user while they are on your website and start a conversation to help them.
Specify operating hours and if there isn't any agent available Online, visitors can still submit a message that will be immediately converted into a ticket.
Setting up chat
Chat is already installed when you integrate Interakt and you can customize the App. Let us see how we do that.
To customize "Chat widget", login to your Interakt account, navigate to "Chat" on the left nav and click on Chat Settings under Settings.
Alternatively, click the Settings Icon in the lower left corner and navigate to Chat Settings under Features.
Chat Widget:
Make sure the widget is turned on and start off by editing the widget settings
Appearance Settings:
Customize the look and feel of your Chat Window. Give it a title, specify widget properties and choose whether you want to show the chat window with a time delay.
Check Get Sound Alerts to notify agents when there is a new chat or a message.
Message Settings
Customize "Default Reply Message" and other alerts
Welcome Settings:
Welcome users by showing default messages and let users know who is online or show a specific agent who are ready to answer them
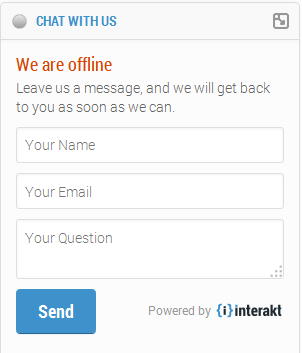
Interakt allows visitors and users to send their queries using the offline contact form when you and your agents are not available online. Administrators can customize the form text and messages if they wish.
- Label Text: Customize lables for Name, Email, Contact number and Subject fields
- Messages: Edit widget title and message text to show when you are offline
- Thank you message: Acknowledge and thank your users for leaving their message
Chat Targetting
Select devices to target and specify pages where you want to show the chat widget. By default, Interakt shows the widget on all pages.
- Page Targeting: Specify where you want to show the widget. Interakt lets you select a particular page on which you want to show it.
- Device Targetting: Choose "Web & Mobile" to show the widget both on Web and Mobile browsers. Select "Web" if you don't want your users to access it on mobile screens
Offline Mode:
Interakt allows visitors and users to send their queries using the offline contact form when you and your agents are not available online. Administrators can customize the form text and messages if they wish.
- Form Header: Give the header a name and enter a message to show when you are offline
- Form Fields: Interakt lets you edit field labels. Feel free to use your own language if you wish
- Post Submission Messages: Acknowledge and thank your users for leaving their message
Prechat Form
Enable Prechat form, if you wish to collect details about visitors and add them as leads. You can edit and translate Header and field labels.
Operating Hours:
Interakt Chat was designed to specify operating hours and make the chat system run only in the timings your support team is available.
If your support staff is available 5 days a week with fixed hours, you can specify the same under "Operating Hours". These can be updated later at anytime you wish.
To manage,
- Look for "Operating Hours" under Chat Settings and click Settings
- Select your Time Zone on the left of the settings window.
- Choose operating days and hours for each day of the week for the project. Unselected days will be treated as non-operating.
- Click on Save
- You can disable and re-enable operating hours by clicking toggling the "On/Off button on the top right"
- The operating hours are dependent on your time zone. Make sure your Time Zone is set correctly under Project Settings
Chat Triggers
A Chat Trigger is a rule that you define to initiate an action when a specific event occurs. For example, a Chat Trigger can be used to introduce your mobile app if the customer visited your website from his Android tablet. Another can be created to welcome him with a custom message and offer your help.
Automation with triggers will help you provide a personalized experience for visitors and users based on event and conditions you set up. You can choose which action to perform if certain conditions are met.
To create,
Note: In the following example we’ll be creating a trigger that automatically greets Android users. It executes when a visitor visits your website.
- Go to Settings
- Click on "Trigger Settings" in the side menu
- Click on Add New Trigger
- Name your new trigger
- Choose an event on which you want to fire the Trigger
- Specify whether you want the Trigger to be executed repeatedly
- Specify when and where you want to execute
- Page URL Filter: Enter page address where you want the Trigger to be executed You can specify multiple URLs by clicking on "Add URL"
- Time on Current Page: Decide if you want to execute the Trigger with some delay
- Number of Visits: Specify after how many visits the action be performed
- Browser Agent: Filter visitors/users based on the browser software they use
- Devices: Filter visitors or users based on the device type
- Operating System: Filter visitors/users based on the OS they use
- Choose from two action types:
- Open chat widget: Choose this action to open the widget when specified conditions are met
- Send an automated reply: Choose this if you want to send a message automatically
- Hit "Save"
- Navigate to Settings and click on "Trigger Settings"
- Find the chat Trigger you want to enable and toggle the On/Off button to start greeting your visitors.
- Navigate to Settings and click on "Trigger Settings"
- Find the chat Trigger you want to disable and toggle the On/Off button. You can enable it any time simply by toggling it back to On.
- Navigate to Settings and click on "Trigger Settings"
- Find the Chat Trigger you want to modify and click Edit
- Make necessary changes and click "Save".
- You can delete a Trigger if you decide not to use it anymore. To delete,
- Navigate to Settings and click on "Trigger Settings"
- Find the Trigger you want to delete and click Delete
- Click "Ok" to confirm
- Event: Choose "Chat Load"
- Condition: Look for "Page URL filter" under "Conditions", select "Is" from the dropdown and enter your pricing page URL, e.g., http://yoursite.com/pricing
- Action Type: Specify "Open Chat Widget"
- Click "Save" to publish
- Event: Choose "First message received"
- Message Content: Draft your welcome message
- Click "Save" to publish
- Event: Choose "Chat Load"
- Condition: Look for "Number of visits" under "Conditions", select "Equal to" from the dropdown and enter "1" in the data field.
- Ation Type: Select "Send automatic reply" and enter your welcome message
- Click "Save" to publish
- Login to your Interakt account and navigate to Chats by clicking on the "Chat" icon from the left nav.
- This button will be red when you have a new incoming chat.
- When you are dealing with multiple chats Interakt alerts you every time a new message is submitted in the other chat so that you can switch to it and reply.
- Pick up the Chat and join the conversation by clicking names on the left.
Users & Leads are listed by their names and unknown visitors are given a randomized ID.
- Chat filters on the top navigation bar enable you to access the list of active chats and history of recent chats.
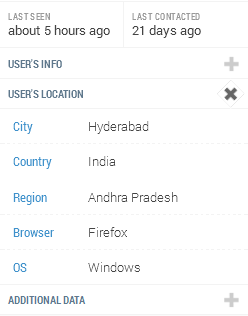
- Chat Area: Interakt offers a distraction free and neatly organized interface to give a better experience for Chat Agents. Agents may see user location and referrer URL from where the visitor come from.
- Chat- Visitor / User Profile:
Learn who you are dealing with and where they are from. You can see the details like- Browser, Operating System, which the visitor use and the Location.
- Click on help icon
- Browse through questions from the dropdown
- Choose the one you want to insert
- Look for the button “Chat Transcript” on the Top left. Click that to open a popup that lets you enter the email addresses to which you want the transcriptions to be sent.
- Enter the email addresses by separating with “comma”.
- Click Send.
- The agents choose the “Helpdesk” App from the side nav.
- To reply visitors, prepare a draft within the ticket response form and hit Reply as Open.
Voilà! The Trigger has been created. Visitors will now be greeted and introduced to your android app as soon as you enable it.
FAQ (Chat Trigger)
How do I enable a Chat Trigger?
Chat Triggers need to be enabled in order to execute. To enable,
How do I temporarily disable a Trigger?
Chat Triggers can be disabled temporarily if you don't want them to run for a particular period. To disable,
How do I edit a Chat Trigger?
You can update characteristics of a chat Trigger at anytime. To edit,
How do I delete a Chat Spark?
Automation Scenarios
Here are some possible scenarios to automate live chat actions
Pop-up on pricing page with a default welcome message
To show popup widget to visitors when they visit the pricing page,
Welcome visitors as soon as they start conversation
To greet your visitors as soon as they submit their first message and let them know you are there to help,
Offer demo to newly registered users
To send a custom message to newly registered users as soon as they visit My Account page,
Dealing With Chat Conversations
How do visitors begin conversations?
Users or visitors can reach you just by clicking on the sticky chat button or a custom popup button.
See the Pen Interakt Sticky Chat Widget by Ashok (@asshu) on CodePen.
Is there a way I can make my Interakt chat widget pop up when visitors click on a custom link or a button on my website?
Yes, you need to call the popup using this hook - interaktchat();
Please note that this feature is still in beta.
How do I reply/start a chat?
Visitors can approach you anytime when you are online. The Interakt Live Chat feature will alert you the moment you have new visitors or when a user wants to chat with you so that you don’t miss out at any point of time.
To reply a chat
How do I enable Self Help?
Interakt Self Help makes your job easy by adding searchable FAQs to your widget. Click here for directions on how to enable or disable Self Help.
How do I insert an answer from FAQ as a chat message
Interakt lets you insert answers from FAQ as a message in live conversation. To insert,
Old chats can be accessed under Chat History. To access, just click on the tab "Chat History" in the chat app.
Sending Chat Transcript
Interakt enables you to send Transcript of your Chat with anyone in a simple way. The Chat Transcription can be sent to the user/visitor, an employee or anyone who might need it.
To send a Transcription
Smart Offline Mode
If your agents are really busy and you’d like to hold off chat for a certain period of time you can choose "Smart Offline Mode" and collect questions for you while you are offline.
Visitors are prompted to submit an offline message and they enter their query using the simple message fields- "Name", "eMail address" and "Message".
Interakt alerts the agents over Dashboard and sends an email notification as well.
Replying to offline messages
The offline chats are collected as questions in Helpdesk, so you can easily answer their queries by email or via Interakt Dashboard. See Helpdesk Docs.
To view the message
Also, you can reply to customers by email if they are not available online when you are back.
Quick Settings
Switch Chat Status - Go Offline
Toggle Go Offline on the bottom left of the screen to switch your status.
Enable / Disable Chat Widget
If you would like to enable/disable Chat widget, toggle the slider button from the Settings Menu.
Feel free to connect in case of issues at support@interakt.co
⇪ To Contents