Zapier Integration
Interakt seamlessly integrates with Zapier. Using Zapier you can now automate tasks between various online services and Interakt. This will ensure that you can migrate data from various services to Interakt and vice versa. Some of the current Zaps include Trello, Wufoo, MailChimp and many more.
Contents
- What is a Zap?
- Triggers
- Actions
- Integrate Interakt with Trello
- Integrating Interakt with Slack
- Integrating Olark with Interakt
- Integrating Freshdesk with Interakt
- Integrating Hipchat with Interakt
- Integrating MailChimp with Interakt
- Integrating HubSpot CRM with Interakt
- Integrating Basecamp with Interakt
- Integrating Glip with Interakt
- Integrating Google Contacts with Interakt
- Integrating Userengage with Interakt
- Integrating Happyfoxchat with Interakt
You will need a Zapier account in order to create Zaps. Signing up to Zapier's free plan is easy and you can make any zap without any coding knowledge. They also have paid plans for higher volume and usage.
What is a Zap?
Zaps are connections between two apps. For example, you can create a Zap where you get alerts on your Slack channel if you have received a new ticket at Interakt. Here, Interakt is a Trigger app and Slack is an Action App.
Triggers
Triggers are the events where Zapier allows Interakt send data to other applications, e.g., Sending a Slack notification on new feedback from a customer.
Interakt has four Zapier Triggers. They are:
- New Member - Triggers when a new member is created in your project.
- New Lead - Triggers when a new lead is created in your project.
- New Feedback - Triggers when a new feedback is received in your project.
- New Chat Conversation - Triggers when a new chat conversation initialized by Lead/Member.
To use triggers and hundreds of other services follow the following steps. Let's see how to create a Zap using Interakt as a Trigger app and Slack as an Action App.
Start off by logging into Zapier and clicking on Make a Zap!. Give the "Zap" a name and start configuring Trigger and Action apps.
Step 1- Setting up Interakt as a Trigger App
Choose App
- Search and select Interakt under "Choose App"
- Choose from the four available triggers. In this example, we chose "New Feedback" that triggers when a new feedback is received. Then click "Save + Continue"
Choose Account
- Connect a new Interakt account by entering API credentials or choose from existing accounts
- Click "Save + Continue"
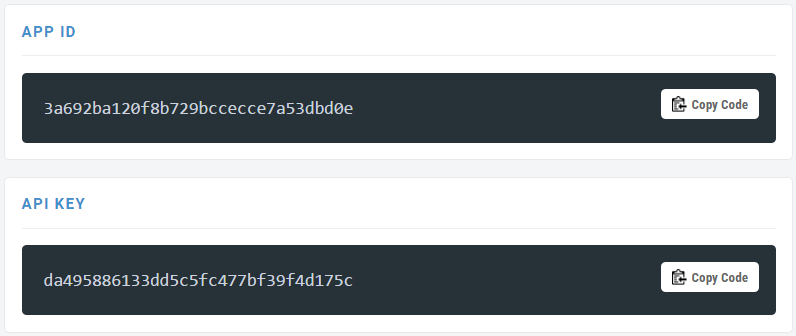
To get your API Key
Log into your Interakt Account.
Choose the project you want to enable the zap for.
Navigate to settings (click the gear icon in the sidebar), and retrieve your API Token from the API Information tab.
Test this step
- Here Zapier wants your approval to test the connection and get data from Interakt to find placeholders. Make sure to send a test ticket to your Interakt project through email
- Click "Connect & Continue" to receive sample data. You can skip the test if you wish to use sample data provided by Zapier.
Step 2- Setting up an Action App
Choose App
- Search and select the app you wish to use under "Choose App". We chose Slack in this scenario
- Choose from the available triggers. In this example, we chose "Send Channel Message" that sends a message when you receive a feedback on Interakt. Then click "Save + Continue".
Choose Account
- Connect and authorise your Slack account
- Click "Continue"
Setup Template
- Set up a template for the channel messages that you want to receive
- Select a channel to which you want to receive the message
- Enter the message that you wish to show. You can specify placeholders by inserting fields from Interakt. For example, Message and Email
- Update Bot details if you wish and click Continue
- Slack creates a draft itself to test the Zap and asks you to review the draft. Click "Create & Continue" after reviewing it
- Click Finish
Voila! Now you're ready to get Interakt and Slack working together. Turn it on to start receiving messages.
Now setup relevant actions for the corresponding triggers and start using your zap.
You can add more Action apps by clicking on "+" icon
Interakt Actions
Actions are the events where Zapier lets Interakt receive data from other applications.
New Member - Creates a new member in your project.
New Lead - Create a new lead in your account.
To use Interakt actions with Zapier and hundreds of other services follow the following steps. Let's see how to make Zap using Interakt as an Action app and Typeform as a Trigger app
Start off by logging into Zapier and clicking on Make a Zap!. Give the "Zap" a name and start configuring a trigger and an action.
Step 1- Setting up a Trigger App
Choose App
Find your trigger app using the search box. In this example, we will integrate Typeform with Interakt to capture leads from its form entries.
Choose from the available triggers and click "Save + Continue". In this scenario, we chose "New Entry" that triggers when a user fills out a specific typeform.
Choose Account
- Connect the trigger app's account by entering API credentials
- Click "Save + Continue"
- Choose the form that you want to import from
Test this step
- Here Zapier wants your approval to test the connection and fetch data from the trigger app to find placeholders
- Click Connect & Continue to receive data. You can skip the test if you wish to use sample data provided by Zapier.
Now you have to setup relevant actions for the corresponding triggers.
Step 2- Setting up an Action App
Choose App
- Choose Interakt as an Action app
- Choose from the two available triggers - Create Member and Create Lead. In this example, we chose "Create Lead" to capture contact details whenever a typeform user fill a particular form. Then click "Save + Continue".
Choose Account
- Connect your Interakt app by entering API credentials
- Click "Continue"
Getting Interakt's API Key
- Log into your Interakt Account.
- Choose the project you want to enable the zap for.
- Navigate to settings (from the gear icon in the sidebar), and retrieve your API Token from the API Information tab.
Setup Template
- Set up a template to capture Interakt Leads
- Enter the message that you wish to show. You can specify placeholders by inserting fields from the trigger app. For example, select
- Click "Create & Continue" to execute the test action
- Click "Finish" to save changes
Voila! Now you're ready to get Typeform and Interakt working together. Turn the Zap on to start receiving messages.
Using precreated Zaps (Interakt as a trigger app)
Zapier has some precreated Zaps for Interakt. To use them,
- Log in to your Zapier Account.
- Choose "Interakt" from the explore section, it will list all the preconfigured zaps for Interakt.
- Click on "Use this Zap" to configure as per your requirements
Integrating Interakt with Trello
By integrating Trello with Interakt, you can create cards from Leads, Tickets and more. This is useful if you want to use Interakt data for project management, bug tracking and keep track of the events interally.
Triggers are the events where Interakt send data to other applications. In this scenario, we configure Zapier's Interakt Trigger to open a new Trello Card whenever a user/visitor reports an Issue via Interakt Feedback form. Let us see how we configure.
Step 1- Set up Interakt as a Trigger app
Start off by logging into Zapier and clicking on Make a Zap!. Give the "Zap" a name and start creating a trigger and an action.
Choose App
- Search and select Interakt under "Choose App"
- Choose "New Feedback" that triggers when a new feedback is received. Then click "Save + Continue"
Choose Account
- Connect your Interakt account by entering API credentials
- Click "Save + Continue"
Getting Your API Key
- Log into your Interakt Account.
- Choose the project you want to enable the Zap for.
Test this step
- Here Zapier wants your approval to test the connection and get data from Interakt to find placeholders. Make sure to send a test ticket to your Interakt project through email
- Click Connect & Continue to receive data. You can skip the test if you wish to use sample data provided by Zapier.
Step 2- Set up Trello as an Action App
Choose App
- Search and select Trello under "Choose App"
- Choose from the three available actions. In this example, we chose "Create Card" that opens a card when you receive a feedback on Interakt. Then click "Save + Continue".
Choose Account
- Connect your Trello account by entering API credentials
- Click "Continue"
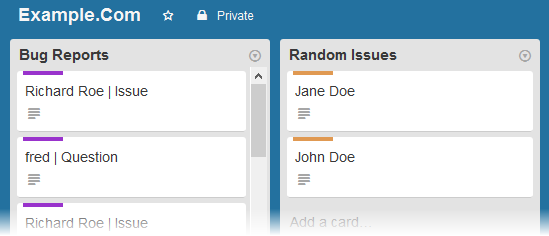
Setup Template - configure a template for the Trello card you want to create
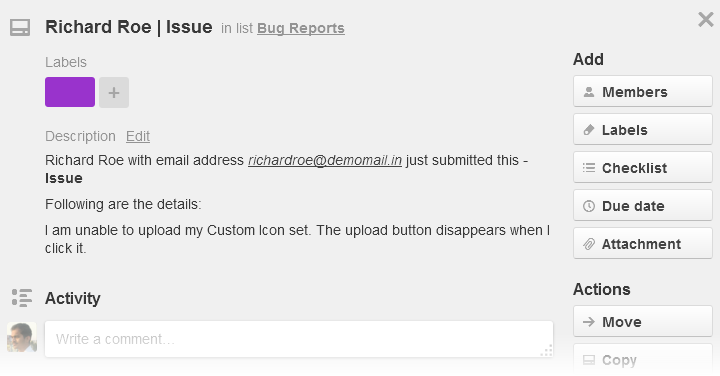
- Match up Interakt Feedback to Trello Card: Specify a Trello Board and the List where you want to submit the Tasks. In the Name and Description fields, insert Interakt fields which you want to import to the Trello Cards. In this sample scenario, I am choosing “Name” & "category" to show up as the card title and other fields in the description.
- Pick a label and set a position
- Select members to whom you want to assign newly created cards
- Specify the due date and other card details
- Zapier creates a draft itself to test the Zap with some sample data and asks you to review it. Click Create & Continue after reviewing the sample data
- Click Finish
Voilà! We finished configuring the Zap, give it a name and click “Turn Zap On” to start converting tickets into Trello Cards.
Integrating Interakt with Slack
By integrating Slack with Interakt, you can send channel messages, direct messages and more. This is useful if you want to get alerts when there is a new activity on your nterakt Project.
Triggers are the events where Interakt send data to other applications. In this scenario, we configure Zapier's Interakt Trigger to receive an alert on Slack whenever a user/visitor reports an issue through Interakt. Let us see how we configure Interakt Triggers with Zapier and Slack.
To configure Interakt Triggers,
Start off by logging into Zapier and clicking on Make a Zap!. Give the "Zap" a name and start creating a trigger and an action.
Step 1- Setting up Interakt as a Trigger App
Choose App
- Search and select Interakt under "Choose App"
- Choose from the four available triggers. In this example, we chose "New Feedback" that triggers when a new feedback is received. Then click "Save + Continue"
Choose Account
- Connect your Interakt account by entering API credentials
- Click "Save + Continue"
Test this step
- Here Zapier wants your approval to test the connection and get data from Interakt to find placeholders. Make sure to send a test ticket to your Interakt project through email
- Click Connect & Continue to receive data. You can skip the test if you wish to use sample data provided by Zapier.
Step 2- Setting up Slack as an Action App
Choose App
- Search and select Slack under "Choose App"
- Choose from the six available triggers. In this example, we chose "Send Channel Message" that sends a message when you receive a feedback on Interakt. Then click "Save + Continue".
Choose Account
- Connect your Slack account by entering API credentials
- Click "Continue"
Setup Template
- Set up a template for the channel messages that you want to receive
- Select a channel to which you want to receive the message
- Enter the message that you wish to show. You can specify placeholders by inserting fields from Interakt. For example, Message and Email
- Update Bot details if you wish and click Continue
- Slack creates a draft itself to test the Zap and asks you to review the draft. Click Create & Continue after reviewing it
- Click Finish
Voila! Now you're ready to get Interakt and Slack working together. Turn it on to start receiving messages.
Integrating Olark with Interakt
Capture leads from visitor conversations via Olark on your website.
How It Works
- A visitor ends conversation using Olark widget on your website
- Zapier automatically adds contact details to Interakt's Leads App
What You Need
- Olark account
- Interakt account
To configure Interakt as the Action App,
Start off by logging into Zapier and clicking on Make a Zap!. Give the "Zap" a name and start creating a trigger and an action.
Please note that your Olark account must be a paid subscription
Step 1- Setting up Olark as a Trigger App
Choose App
- Search and select Olark under "Choose App"
- Choose from the two available triggers. In this example, we chose "New Transcript" that triggers whenever your visitor send a message. Then click "Save + Continue"
Choose Account
- Connect your Interakt account by entering API credentials
- Click "Save + Continue"
Test this step
- Here Zapier wants your approval to test the connection and get data from Olark to find placeholders. Make sure to send a test message via Olark widget
- Click Connect & Continue to receive data. You can skip the test if you wish to use sample data provided by Zapier.
Step 2- Setting up Interakt as an Action App
Choose App
- Search and select Interakt under "Choose App"
- Choose from the two available triggers - Create Member and Create Lead. In this example, we chose "Create Lead" to capture contact details whenever a visitor start conversation via Olark. Then click "Save + Continue".
Choose Account
- Connect your Interakt account by entering API credentials
- Click "Continue"
Setup Template
- Select a channel to which you want to receive the message
- Enter the message that you wish to show. You can specify placeholders by inserting fields from Interakt. For example, select Email to capture visitor's email id
- Click Create & Continue to execute the test action
- Click Finish to save changes
Set up a template to capture Interakt Leads
Voila! Now you're ready to get Interakt and Olark working together. Turn the Zap on to start receiving messages.
Integrating Freshdesk with Interakt
Capture user data from new tickets sent to your Freshdesk's Helpdesk
How It Works
- A visitor raises a ticket in your Freshdesk Helpdesk
- Zapier will automatically import the ticket owner's details to Interakt's Users App
What You Need
- Freshdesk account
- Interakt account
To add user data from Freshdesk using Zapier,
Start off by logging into Zapier and clicking on Make a Zap!. Give the "Zap" a name and start creating a trigger and an action.
Step 1- Setting up Freshdesk as a Trigger App
Choose App
- Search and select Freshdesk under "Choose App"
- Choose from the two available triggers - New Customer and New Ticket. In this example, we chose "New Ticket" that triggers whenever your visitor raise tickets. Then click "Save + Continue"
Choose Account
- Connect your Freshdesk account by entering API credentials
- Click "Save + Continue"
Test this step
- Here Zapier wants your approval to test the connection and get data from Freshdesk to find placeholders. Make sure to send a test ticket via Freshdesk widget or their Email Piping feature
- Click Connect & Continue to receive data. You can skip the test if you wish to use sample data provided by Zapier.
Step 2- Setting up Interakt as an Action App
Choose App
- Search and select Interakt under "Choose App"
- Choose from the two available triggers - Create Member and Create Lead. In this example, we chose "Create User" to capture contact details whenever a user submits a ticket. Then click "Save + Continue".
Choose Account
- Connect your Interakt account by entering API credentials
- Click "Continue"
Setup Template
- Enter the message that you wish to show. You can specify placeholders by inserting fields from Interakt. For example, select Email to capture visitor's email id
- Click Create & Continue to execute the test action
- Click Finish to save changes
Set up a template to add Interakt User Data
Voila! Now you're ready to get Interakt and Freshdesk working together. Turn the Zap on to start adding Users to Interakt from Freshdesk userbase.
Integrating Hipchat with Interakt
By integrating Hipchat with Interakt, you and your team members can get notified when there is a ticket, chat or any update on Interakt. This makes your team collaboration over Hipchat more effective by bringing important customer data onto team chat.
Triggers are the events where Interakt send data to other applications. In this scenario, we configure Zapier to send a message and alert team members on Hipchat when a user create an account on your website.
To configure Interakt Triggers with Zapier and Hipchat
Start off by logging into Zapier and clicking on Make a Zap!. Give the "Zap" a name and start creating a trigger and an action.
Step 1 - Create a Zap using Interakt as a Trigger App
Choose App
- Search and select Interakt under "Choose App"
- Choose from the four available triggers. In this example, we chose "New Feedback" that triggers when a new ticket is submitted. Then click "Save + Continue"
Choose Account
- Connect your Interakt account by entering API credentials
- Click "Save + Continue"
Getting Your API Key
- Log into your "Interakt Account".
- Choose the project you want to enable the Zap for.
- Navigate to the "Settings" (from the gear icon in the sidebar), and retrieve your API Token from the API Information tab.
Test this step
- Here Zapier wants your approval to test the connection and get data from Interakt to find placeholders. Make sure to send a test ticket to your Interakt project through email
- Click "Connect & Continue" to receive sample data. You can skip the test if you wish to use sample data provided by Zapier.
Step 2- Setting up Hipchat as an Action App
Choose App
- Search and select Hipchat under "Choose App"
- Choose from the two available actions - New Message and Update Room Topic. In this example, we chose "New Message" that sends a message when you receive a feedback on Interakt. Then click "Save + Continue".
Choose Account
- Connect your Hipchat account by entering API credentials
- Click "Continue"
Setup Template
- Match up Interakt Feedback to Hipchat Message: Select a Hipchat Room where you want to receive alerts. In the From and Message fields, insert Interakt placeholders which you want to import. In this sample scenario, I am choosing “Name” & "Email" to show up in the message.
- Pick a color, specify whether you want to hear a sound and choose message format. Click "Continue" to proceed
- Click Create & Continue to execute the test action
Voila! Now you're ready to get Interakt and Slack working together. Turn it on to start receiving messages.

Integrating MailChimp with Interakt
Capture leads from MailChimp subscribers
How It Works
- A visitor subscribes to your MailChimp's list
- Zapier will automatically import the subscriber's details to Interakt's Leads App
What You Need
- MailChimp account
- Interakt account
To capture leads from MailChimp lists using Zapier,
Start off by logging into Zapier and clicking on Make a Zap!. Give the "Zap" a name and start creating a trigger and an action.
Step 1- Setting up MailChimp as a Trigger App
Choose App
- Search and select MailChimp under "Choose App"
- Choose from the eight available triggers. In this scenario, we chose "New Subscriber" that triggers when a new subscriber is added to a list. Then click "Continue"
Choose Account
- Connect your MailChimp account by entering API credentials
- Click "Save + Continue"
Test this step
- Here Zapier wants your approval to test the connection and get data from Freshdesk to find placeholders.
- Click Connect & Continue to receive data.
Step 2- Setting up Interakt as an Action App
Choose App
- Search and select Interakt under "Choose App"
- Choose from the two available actions - Create Member and Create Lead. In this example, we chose "Create Lead" to capture contact details whenever a user submits a ticket. Then click "Save + Continue".
Choose Account
- Connect your MailChimp account by entering API credentials
- Select a list from which you want to import data
- Click "Continue"
Setup Template
- Specify MailChimp placeholders for Name and email fields. Then enter a message that you wish to show.
- Click Create & Continue to execute the test action
- Click Finish to save changes
Set up a template to import MailChimp Data
Voila! Now you're ready to get Interakt and MailChimp working together. Turn the Zap on to start capturing leads from your MailChimp list.
Integrating HubSpot with Interakt
Import HupSpot contacts to Interakt
How It Works
- You add a contact to HubSpot
- Zapier will automatically import the contact to Interakt's Users App
What You Need
- HubSpot CRM account
- Interakt account
To import contacts from HubSpot CRM using Zapier,
Start off by logging into Zapier and clicking on Make a Zap!. Give the "Zap" a name and start creating a trigger and an action.
Step 1- Setting up Hubspot CRM as a Trigger App
Choose App
- Search and select HubSpot CRM under "Choose App"
- Choose from the two available triggers. In this scenario, we chose "New Contact" that triggers every time a new contact is created in HubSpot. Then click "Save + Continue"
Choose Account
- Connect your HubSpot CRM account by entering your hub id
- Click "Save + Continue"
Test this step
- Here Zapier wants your approval to test the connection and get data from HubSpot CRM to find placeholders. Make sure you have at least one recent contact created.
- Click Fetch & Continue to receive data.
Step 2- Setting up Interakt as an Action App
Choose App
- Search and select Interakt under "Choose App"
- Choose from the two available actions - Create Member and Create Lead. In this example, we chose "Create Member". Then click "Save + Continue".
Choose Account
- Connect your Interakt account by entering your API details
- Click "Continue"
Setup Template
- HubSpot CRM offers placeholders for almost all Interakt fields.
- Click Create & Continue to execute the test action
- Click Finish to save changes
Set up a template to import contacts
Voila! Now you're ready to get Interakt and HubSpot CRM working together. Turn the Zap on to start converting HubSpot CRM contacts as Interakt users.
Integrating Basecamp with Interakt
By integrating Basecamp with Interakt, you can create messages, comments and todo lists from Feedback and Chat conversations. This is useful if you want to use Interakt data for project management, bug tracking and keep track of the events interally.
In this scenario, we configure Zapier's Interakt Trigger to create a New Message whenever a user/visitor raises a ticket via Interakt. Let us see how we configure:
Step 1- Set up Interakt as a Trigger app
Start off by logging into Zapier and clicking on Make a Zap!. Give the "Zap" a name and start creating a trigger and an action.
Choose App
- Search and select Interakt under "Choose App"
- Choose "New Feedback" that triggers when a new feedback is received. Then click "Save + Continue"
Choose Account
- Connect your Interakt account by entering API credentials
- Click "Save + Continue"
Getting Your API Key
- Log into your Interakt Account.
- Choose the project you want to enable the Zap for.
Test this step
- Here Zapier wants your approval to test the connection and get data from Interakt to find placeholders. Make sure to send a test ticket to your Interakt project through email
- Click Connect & Continue to receive data. You can skip the test if you wish to use sample data provided by Zapier.
Step 2- Set up Basecamp as an Action App
Choose App
- Search and select Basecamp under "Choose App"
- Choose from the 12 available actions. In this example, we chose "Create Message" that creates a message when you receive a feedback on Interakt. Then click "Save + Continue".
Choose Account
- Connect your Basecamp by authorizing Basecamp
- Click "Continue"
Setup Template - configure a template for the Basecamp message you want to create
- Match up Interakt Feedback to Basecamp message: Select a Basecamp project and the board where you want to create messages. In the Subject and Content fields, insert Interakt fields which you want to append to Basecamp message. In this sample scenario, I am choosing "category" & "Email" to show up with the message.
- Zapier creates a draft itself to test the Zap with some sample data and asks you to review it. Click Create & Continue after reviewing the sample data
- Click Finish
Voilà! We finished configuring the Zap, give it a name and click “Turn Zap On” to start converting tickets into Basecamp Messages.
Integrating Interakt with Glip
By integrating Glip with Interakt, you can alert teams with a post everytime you have a feedback or a chat. This is useful if you want to alert entire team with a quick update when there is a new activity on your Interakt Project.
In this scenario, we configure Zapier's Interakt Trigger to receive an alert on Glip everytime a user/visitor raises a ticket through Interakt.
To configure Interakt Triggers,
Start off by logging into Zapier and clicking on Make a Zap!. Give the "Zap" a name and start creating a trigger and an action.
Step 1- Setting up Interakt as a Trigger App
Choose App
- Search and select Interakt under "Choose App"
- Choose from the four available triggers. In this example, we chose "New Feedback" that triggers when a new feedback is received. Then click "Save + Continue"
Choose Account
- Connect your Interakt account by entering API credentials
- Click "Save + Continue"
Test this step
- Here Zapier wants your approval to test the connection and get data from Interakt to find placeholders. Make sure to send a test ticket to your Interakt project through email
- Click Connect & Continue to receive data. You can skip the test if you wish to use sample data provided by Zapier.
Step 2- Setting up Glip as an Action App
Choose App
- Search and select Glip under "Choose App"
- Glip offers only one action, i.e., Create Post. Select the action and click "Save + Continue".
Choose Account
- Connect your Glip team or conversation by entering the integration id
- Click "Continue"
Setup Template
- Set up a template for the post that you want to receive
- Enter activity line. You can select Interakt's email placeholder.
- Enter the subject. You can specify placeholders by inserting Name and Category fields from Interakt. For example, Category | Name
- Zapier creates a draft itself to test the Zap and asks you to review the draft. Click Create & Continue after reviewing it
- Click Finish
Voila! Now you're ready to get Interakt and Glip working together. Turn it on to start receiving messages.
Integrating Google Contacts with Interakt
Zapier offers a premade zap that helps you import contacts to Interakt. Once activated, Zapier will take care of copying all that data around, creating a new member on Interakt for every new contact you add on Google Contacts.
How It Works
- A new contact is created on Google Contacts
- Zapier automation adds a new member to Interakt
What You Need
- Google Contacts account
- Interakt account
Start off by logging into Zapier and clicking on Explore. Look for the zap "Send new Google Contacts to Interakt as new members" and click "Use this Zap"
Step 1- Configuring the trigger "New or Updated Contact"
- Make sure you select the trigger "New or Updated Contact" that triggers when a contact is created or updated and click "Continue"
- Connect your Google Contacts account and Click "Save + Continue"
- Select Group: If supplied, the trigger fires when new contacts are added to this particular group.
- Test Trigger: Here Zapier wants your approval to test the connection and get sample data from Googe Contacts. Make sure you have at least one recent contact created and click Fetch & Continue to receive data.
Step 2- Configuring Interakt as an Action App
- Make sure you select the trigger "Create Member" that adds new member to your Interakt project on firing the above configured trigger
- Connect your Interakt account by entering your API details and click "Continue"
- Set up a template: Select placeholders to the fields - Email, City, State and Zip code
- Click Create & Continue to execute the test action
- Click Finish to save changes
Voila! Now you're ready to get Interakt and Google Contacts working together. Turn the Zap on to start importing contacts from your Google account to Interakt.
Integrating Userengage with Interakt
How It Works
- A new contact is created on Userengage
- Zapier automatically adds contact details to Interakt's Leads App
What You Need
- Userengage account
- Interakt account
To configure Interakt as the Action App,
Start off by logging into Zapier and clicking on Make a Zap!. Give the "Zap" a name and start creating a trigger and an action.
Step 1- Setting up Userengage as a Trigger App
Choose App
- Search and select Userengage under "Choose App"
- Choose "Contact Created" and click "Save + Continue"
Choose Account
- Connect your Userengage account by entering API credentials
- Click "Save + Continue"
Test this step
- Here, Zapier wants your approval to test the connection and get data from Userengage to find placeholders. Make sure to send a test message via Userengage
- Click Connect & Continue to receive data. You can skip the test if you wish to use sample data provided by Zapier.
Step 2- Setting up Interakt as an Action App
Choose App
- Search and select Interakt under "Choose App"
- Choose from the two available triggers - Create Member and Create Lead. In this example, we chose "Create Lead". Then click "Save + Continue".
Choose Account
- Connect your Interakt account by entering API credentials
- Click "Continue"
Setup Template
- Select the placeholder "Email" to capture email addresses from chat conversations
- Specify placeholders for Name and Message to import additional lead information. For example, select Name to import visitor's name
- Click Create & Continue to execute the test action
- Click Finish to save changes
Voila! Now you're ready to get Interakt and Olark working together. Turn the Zap on to start receiving messages.
Integrating Happyfoxchat with Interakt
Capture leads from visitor conversations via Happyfoxchat.
How It Works
- A visitor ends conversation using Happyfoxchat widget on your website
- Zapier automatically adds contact details to Interakt's Leads App
What You Need
- Happyfoxchat account
- Interakt account
To configure Interakt as the Action App,
Start off by logging into Zapier and clicking on Make a Zap!. Give the "Zap" a name and start creating a trigger and an action.
Step 1- Setting up Happyfoxchat as a Trigger App
Choose App
- Search and select Happyfoxchat under "Choose App"
- Choose from the three available triggers. In this example, we chose "Finished Chat" that triggers as soon as you finish conversation. Then click "Save + Continue"
Choose Account
- Connect your Happyfoxchat account by entering API credentials
- Click "Save + Continue"
Test this step
- Here Zapier wants your approval to test the connection and get data from Happyfoxchat to find placeholders. Make sure to send a test message via Happyfoxchat widget
- Click Connect & Continue to receive data. You can skip the test if you wish to use sample data provided by Zapier.
Step 2- Setting up Interakt as an Action App
Choose App
- Search and select Interakt under "Choose App"
- Choose from the two available triggers - Create Member and Create Lead. In this example, we chose "Create Lead". Then click "Save + Continue".
Choose Account
- Connect your Interakt account by entering API credentials
- Click "Continue"
Setup Template
- Select the placeholder "Email" to capture email addresses from chat conversations
- Specify placeholders for Name and Message to import additional lead information. For example, select Name to import visitor's name
- Click Create & Continue to execute the test action
- Click Finish to save changes
Voila! Now you're ready to get Interakt and Olark working together. Turn the Zap on to start receiving messages.
If you have any queries drop us an email on support@interakt.co
⇪ To Contents